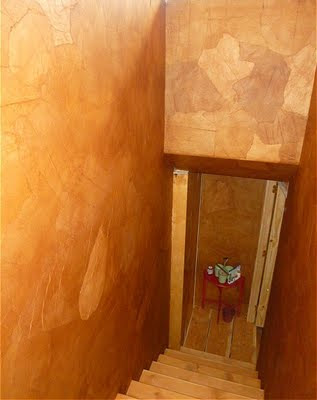
Faux Leather Wall Treatment
for the stairwell.
In January of this year I began to work on
finishing the stairwell. It has been built for
3 years now, and after Christmas this year I decided it was time.
A look at the stairwell's before
A look from the top of the stairs in my studio.
Final coat of drywall mud, then some sanding,
and priming.
Next, I went into where my stash of
and priming.
Next, I went into where my stash of
brown grocery bags saved for just this project.
Kirk and I had a bag ripping and crumpling party.
We tore assorted sized from the bags and
crumpled them up.
So far we have done this 3 times. Grin.
In the end, we had done this 4 times.
So far we have done this 3 times. Grin.
In the end, we had done this 4 times.
The sizes ranged from larger then a dinner plate to about 6 to 8 inches
and we kept straight edges on some for going against moldings
Next, I ironed the paper flat, much easier to
work with and not trying to flatten them out at the wall.
Don't iron the wrinkles out, just flatten them.
Don't iron the wrinkles out, just flatten them.
I used this wallpaper glue, it worked really well
I will have used 3 gallons by time the room is done.
Using a 4 inch paint brush to spread the paste,
first on the wall, stuck the paper on and them more paste over the top.
The paint brush also worked well from smoothing out the paper
and getting air bubbles out.
Test patches in a hidden spot. Just in case this
turned out to be a bad idea......which it didn't.
I discovered a few things as I worked on the walls
1. This is a labor of love.
2. Don't over work the bags once they are on the wall.
As you can see in the picture below they look
horrible, but what happens is they stretch
with the moisture. They will shrink back.
3. DO NOT BE TEMPTED TO CUT SLITS IN ANY BUBBLES!
Ask me how I know.
Again the paper shrinks back when it dries, thus leaving gaps where the cuts are.
Be sure to over lap the edges by at least 1/2 inch or
you could end up with gaps once the paper dries.
Be sure to over lap the edges by at least 1/2 inch or
you could end up with gaps once the paper dries.
I know this picture looks really bad, but again this will not be the final
outcome, this is very wet. I work with is a bit, moving (lifting) and
smoothing once or twice, but then I stop because it just wrinkles again.
Here is how it looks after it dries,
On the lower half of this picture you can see where
I began adding glaze to the wall, it really
makes the look.
Kirk made bookcase for the nook between the doors
And I filled it up with books that have been
in boxes since we moved here 5 years ago
Also done now are the stairs themselves
we did not bother to finish them before.
This was a 2 day process, but the results are beautiful.
****************************************************
Fast forward to May
it is time to finish the papering and glazing of the stairwell.
I got side tracked back in Feb with a commissioned quilt,
one thing leading to another.
With a lull in the work on another quilt
I decided to finish this up.
All the paper is on the walls (2 more afternoons of work)
Just finished so some spots are wet here.
Glazing begins again (another 2 afternoons for this part)
Looking down from the studio
Next up...........the door
the before
Lovely door but kinda plain.
So we tinted some stain green
Now the door is green.
This is the first side, tomorrow the other side.
After finishing the door, Kirk will do the trim,
I will decorate with rust, pictures and quilts.
Glad you could come by
Check back for the finishing touches.
God Bless


2 comments:
What kind of glaze did you use ? I have been using a matt polyurethane ,but as it starts to dry it brings up bubbles,Then I have to go back and glue that down ! This is the neverending bathroom. Because it is a bath,it needs water proofed. Any suggestions ? Thanks debbie
Thank you ... Such great ideas...
Post a Comment